Wednesday, July 16, 2014

One step at a Time

Made a little progress today.


I put on a little less than half of the Eagle's decals this evening.  The yellow tail strips gave me fits and I'm still not 100% happy with them.  I may take them off and paint them on.  More work on this tomorrow.

I made some progress on getting the LaGG-3's canopy masked.  I apologize for the out of focus picture. The canopy framing is very faint in some spots.  I'm using a lighted magnifying lens to work on the canopy and it's still difficult to see to position the masking tape.  Also more work on this tomorrow.

The big event today was that my youngest daughter was involved in an automobile accident this afternoon.  Thankfully no one was hurt, but my wife's car  is going to be out of commission for a while.


I'm trying to think of this in the "glass is half full" way and be grateful that no one was hurt and I'm not spending my evening at a hospital or worse.  Life is precious.  Live it to fulfill your rights to life, liberty, and the pursuit of happiness.

Looking at some LaGG-3 references, I noticed that the LaGG-3 is missing the straps on the wings.  I think I'm going to scribe these on before painting the topside.  More to follow on this.


Thank you to other model builders, you work inspires me to try to do better(if it does sometimes give me an inferiority complex:-{ ).  And thanks to family and friends for your encouragement and patience with my geek like ways.

See ya'll tomorrow.

Tuesday, July 15, 2014

Turning Blue


Got the LaGG-3 masked off.  Ivan is examining the tail landing gear doors.  I was able to lose at least one of them TWICE! before getting them glued on. That upped the aggravation factor for a little while.  This was when I came in from the shop and ate some of my wife's chocolate chip with Oreo crust cheesecake  (yum!).  This had a calming effect and I was able to return to the shop and successfully search the floor for the absconding gear door.  Which I quickly glued into place.  May it stay there for eternity.


Airbrushed the underside with Testor's acrylic Hellblau (light blue).  Topside painting to follow.  I've got to get the canopy masked.


I put on the Eagle's landing gear and applied a gloss coat in preparation for applying the decals.

Ivan! what are you doing?


Had a good day.  See ya'll soon.

Rescue Mission


Dug around the model stash in the shop today and found a number of uncompleted models that I had started at times but have never completed.


I pulled them out and organized them.  My plan is to complete them after finishing the F-15 and LaGG-3 projects.  I will feel better when I get these done.


So more to follow later on this rescue mission.

Monday, July 14, 2014

Canopy Clear Up


I was going to start masking the LaGG-3's canopy.  Noticing some dust and fingerprints I decided clean them off with a quick swipe with a brush dipped in rubbing alcohol.  This was a mistake (I love understated British humor :-) ).  The canopy fogged, and I nearly panicked.  Ok, I did panic.  But then I calmed down and got to work fixing it.


The picture really doesn't show how bad it was.

About an hour to an hour and a half of sanding with 600, 4,000, and 12,000 grit sanding sticks and buffing with a cotton swab got it to this point.  This was much better but still a little opaque.


Then a dip in Future got it clearer.  I took the canopy back off to let it dry under cover for a full 24-48 hours.


I'll re-evaluate once the canopy is fully dry if a second coat of Future is needed.

In some ways this is funny, since historically some LaGG-3 pilots removed their canopies because the manufacturing quality of the Soviet perspex  was so bad.

Sunday, July 13, 2014

D is for Diorama

I thought I would go ahead a put together the base for the F-15.  The model is of a F-15 assigned to the 18th Wing based at Kadena Air Force Base on Okinawa.  So I looked at Kadena AFB on Google Maps and found a F-15 sitting on a hard-stand.


Using this as a starting point, I searched the web for a DIY tarmac section and found a great BoweModel blog article on building a basic WWII era concrete airfield diorama base here: http://bowemodels.blogspot.com/2013/05/technique-building-basic-wwii-era.html 
I used the techniques in this article modifying them as needed for the materials I had on hand around the house.  Also I was assisted by having a Verlinden 1/48 scale carton airfield tarmac section.  I was able to scale down to 1/144 scale from it.


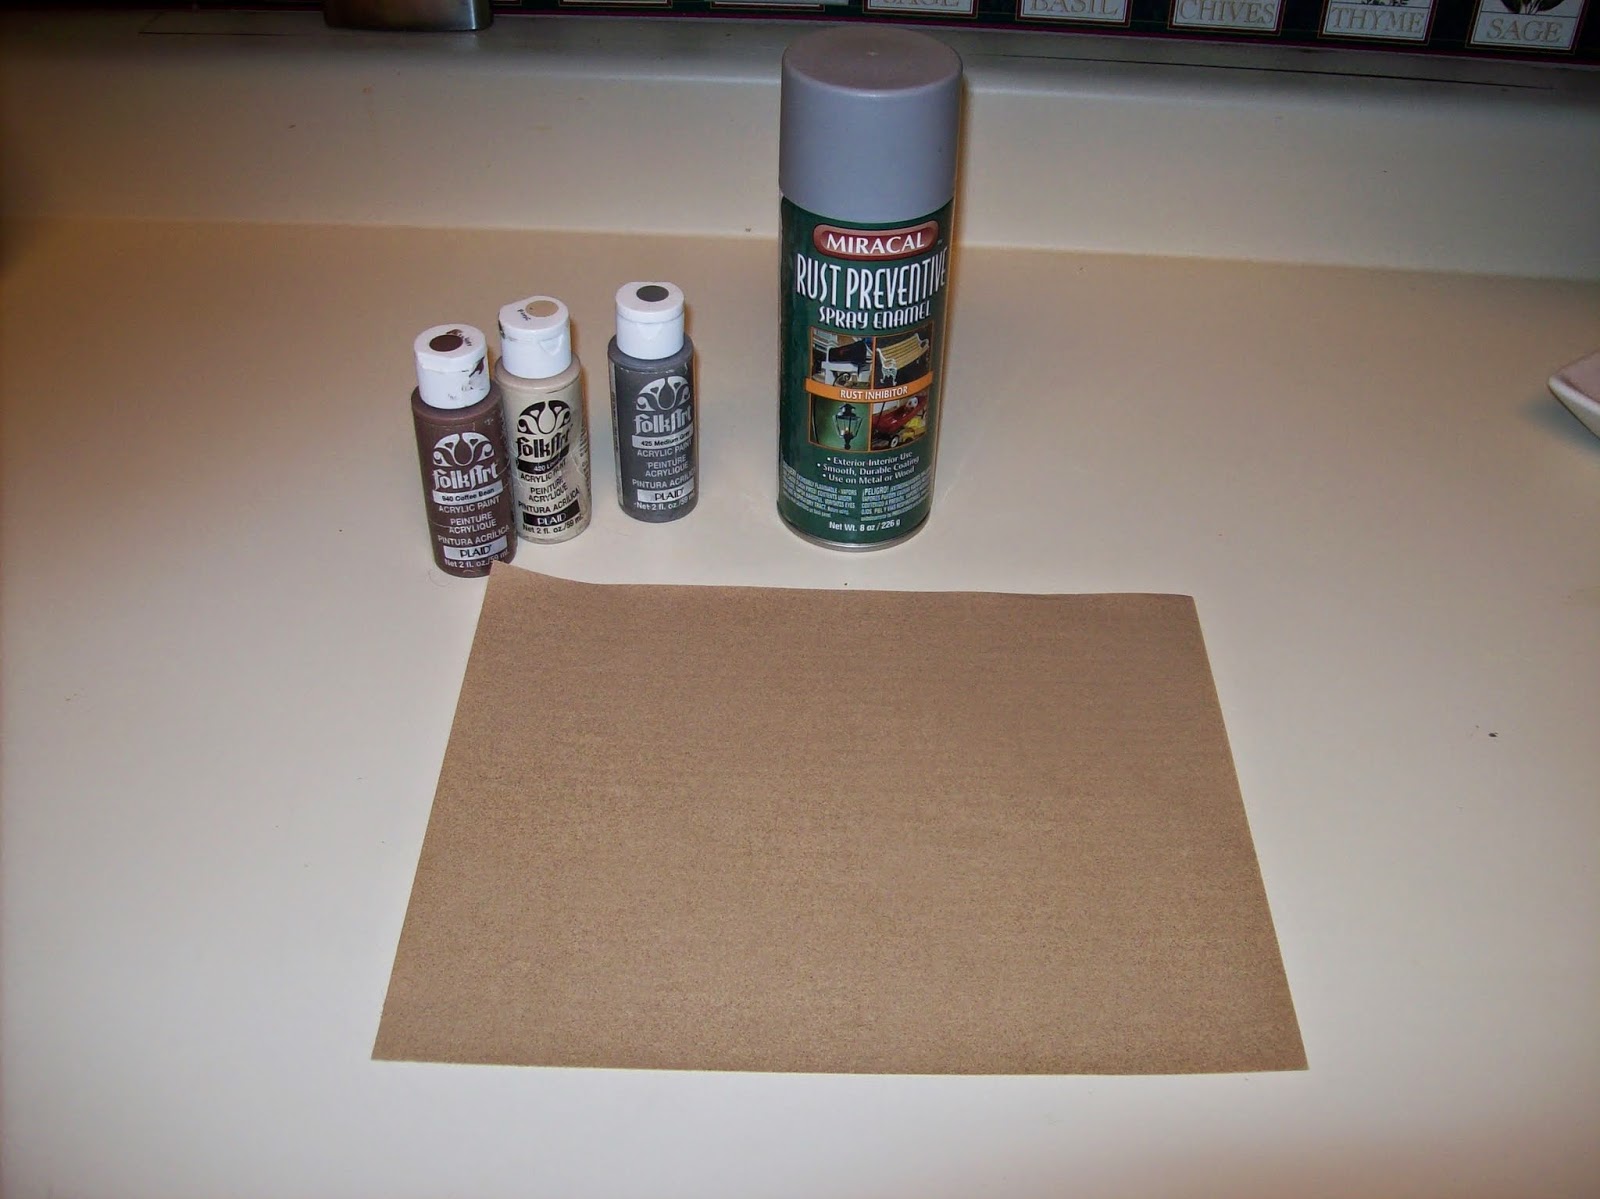
Searching around the house I pulled together some acrylic craft paints, gray primer spray paint, an unused picture frame, and a sheet of 220 grit sandpaper.


I cut out the bottom of the F-15 box.  Drew on the 1/144 scale tarmac sections (3 mm x 3 mm) and used it to rough in the concrete section of the diorama.


Then I transferred the outline to the sheet of sandpaper and cut it out.


Following the directions in the BoweModels article, I drew in the concrete sections and numbered them.


Then cut them out.


I glued them onto the base using PVA (Elmer's Glue All) glue.  I started on the end that would be mating with the frame to make sure I wouldn't run into any issues later.  This was a little tedious, but it pays to pay attention to detail on getting a good spread of glue on each section to keep the edges from lifting ( I only had a couple) and tearing the pieces to add cracks was fun.


Next was painting the tarmac section with gray primer.


Then following the BoweModels article instructions, I painted texture and detail onto the sandpaper.  Note: I did brush paint more than the BoweModels article did ( I was having issues with using the craft paints in my airbrush).  I think if you didn't have an airbrush you could accomplish this just by brush painting if you were careful.


I didn't have any grass mat but used some model railroad turf and ballast.  I spread PVA glue, shook on the turf mix then used the fine ballast to cover gaps around the edge of the sandpaper.  I sealed the turf and ballast with some of my wife's hairspray ;-).


Once everything had dried a while, I carefully fitted the frame and base together.


Voila! a diorama ready for the F-15 once I finish it.


Saturday, July 12, 2014

Up Early and went to work

Got up early and put in some work on the LaGG-3.


Taped off seam on starboard wing root.


Smeared on contour putty and then wiped down with cotton swab dipped in acetone.  This really reduces the amount of sanding I have to do later.


This is really inexpensive source of acetone.  The stuff you buy in the paint section of a hardware store is way more expensive.


Sanded down with sanding sticks. Actually, nail care buffing sticks, way cheaper than those you buy in a hobby store.  I picked some up in 280, 600, 4,000 and 12,000 grit. I used my daughter as cover to gain entrance to the female domain of the nail care store to make my purchase.  If you can't tell by now, I'm really cheap and pursuing my hobby on a budget.  Such is the life of a married man with teenage daughters.


What Ivan is trying to point out here is that we've painted the seam with some silver paint after sanding to check for smoothness.  Unfortunately it revealed that some more sanding is needed :-(.


Also worked a little on the F-15.  Painted the AIM-9 Sparrow missile bodies Light Ghost Gray and added blue (training) warhead bands and brown (live) rocket motor bands.  Web research revealed that the aircraft serial number in the decals is for a F-15D which is a two-seat version used for training so that's why I chose to use blue (training) warhead bands instead of painting them yellow (for live ordinance).  I think they look pretty cool :-).

Friday, July 11, 2014

And then it's 8 months later.

Well shoot, life is funny.  With the best intentions last December I started posting again to this blog then a few days ago while looking for aircraft photos on Google I came across an image I had posted and looked back here and realized that I hadn't posted anything in 8 months.  That plus I had finally cleaned up my shop building and had moved much to my wife's relief , I think, my model stuff out to the shop from our bedroom where it had been cluttering up a desk and occupying a large part of the floor space.  In the course of this I re-discovered my 1/144 scale Academy F-15 and F-4E model kits that I started this blog with  With that I  present the following as a kind of return to the beginning...

After cleaning up my shop and moving my model stuff, I started fiddling with my model kits and opened up the Academy F-15 Eagle kit and just started working on it.  Without realizing it in couple of hours I had the model pretty well put together and had started painting it.  I've worked on it a little each day this week sometimes only 10-15 minutes and thought I'd go ahead and post some pics of my progress.  I'm not promising anything after the starts and fits I've had writing this blog.  But I am feeling good about my progress so far and want to see this one through.


So this is where I finished on day 1 model pretty well put together and a coat of Light Ghost Gray on, the engine area painted silver per the kit instructions and the cockpit (no detail just a blank area) painted Charcoal Gray.


So this is day 3.  I got the canopy glued on,  the framing masked and painted, the top area painted with Dark Ghost Gray per kit instructions, and the engine exhaust "cans" painted and installed. 

Also, I found the LaGG-3 with Ivan and Victor that I had started on back in December and worked on a couple of the seams that needed to be puttied up.


And made a little progress.


Also made a little progress on the F-15


Scraped seams on AIM-7 Sparrow missiles and glued to match sticks for painting


Painted wheels, I'm going to need to retouch these.

and


painted landing gear.